garden lattice scarf

easter egg colorways birthday sparkle and blossoms and bees
sometimes it's the simple things that are happy... these colorful net scarves are just that sort of thing... I made the samples you see here from hand dyed cotton yarns that we made... or hand painted? I'm still not certain I'm clear on the difference... some people dip dye and call it hand painted and some people drip dye and call them hand dyed... everyone says indie dyed now, which is kind of funny... LOLthese are easter egg colorways (an easter egg is a surprise hidden in a program by the writer that can be as much as a whole game or as little as an image and is always a little extra thing to find - in our yarns they're little bits that add randomly to the overall colorway... like rainbows in the pretty pink and white and yellow yarn like sprinkles on a cake or bees and flowers in the sky blue fluffy variegation) that my son and I are working on... because I wanted to see how they worked up.

asymmetry for a more organic and chic look and some bling and fringe for fun.
these scarves can also be worn as belts or headbands, they're soft and flexible and you can tug them out wider or pull them thinner because of the nature of how the netting works.

5.5 or 6mm crochet hook
worsted weight yarn, I recommend cotton and you can use any yarn you like for this
scissors
darning or yarn needle
Abbreviations
ch = chain
dc = double crochet
hdc = half double crochet
f/o = finish off
m/c = magic circle, a slip knot that is crocheted into so that it can be drawn tightly down
sc = single crochet
sl = slip stitch
tc = treble or triple crochet
cluster = the prescribed grouping of stitches worked as one feature in a pattern - in this case petals on the flower
(#) = number of stitches in the row (only on last row)
Notes
- the bottom of the birthday sparkle scarf is a queen anne's lace scarf - crochetchiq has a great tutorial and I use it whenever I am making queen anne's lace. she is already demonstrating someone else's pattern, it seems risky in our litigious society to do more than point you there if you would like to use that as your floral motif like I did
-I did what I could to have the fewest possible tie in's in this scarf and so the flower is all part of the pattern... I have included instructions for if you would like to add multiple flowers, and there will be a little more sewing in your ends.
-please be aware that the clusters worked in one stitch will cause them to balloon out over the next stitch, between each of the 6 clusters to form the flower I count to be sure that I still have an even number left or I tug the cluster over a bit until I can see my "next" stitch... the pattern is designed to lose one, not two on each cluster.


Round 1: work 12 sc in a m/c and wait to draw it tight and sew in your end until after Round 2
Round 2: worked in clusters all in same stitch, sc, hdc, 2 dc, tc, 2 dc, hdc, sc - then count to be sure you have an even number of stitches still remaining or tug your cluster over a bit to find it... and work the same cluster in every other stitch remaining (1, 3, 5, 7, 9, 11) sl into first stitch to end this Round
Row 1: ch 6 and sl into the tc at the top of the flower petal closest, ch 6 and sl into the space between the two petals, ch 6 and sl into the tc at the top of the next flower petal, ch 6 and sl into the space between the petals, ch 6 and turn
Row 2: sl into the last ch 6 from the previous row and ch 6, continue to ch 6 and sl into the top of the next loop to the end (in this pattern there are only 4 ch loops per row) and when you sl into the last loop then ch 6 and turn. On your last row ch only 1 and turn
Rows 3-48: Repeat Row 2 until you have reached your desired length. I did a total of 48 rows of ch loops, including the first Row.
Row 49: ch 1 from previous Row counts as first sc, 2 sc in first ch loop, ch 1, 2 sc in next loop and ch 1, 2 sc in next loop and ch 1, 2 sc in last loop and then work one sc in 3rd ch from bottom of loop to secure the stitch in place. (12) ch 50 and turn
Row 50: sl into 2nd stitch in row, sl into ch sp of previous row and ch 5 then sl into same stitch. continue this pattern... sl into 3rd stitch, ch 50 and sl into 4th stitch to finish then sl into ch sp and ch 5 and sl into same space... you should have 4 ch tassels and 3 loops. f/o and sew in end.
Queen Anne's Lace Version Variation:
I did the first 5 Queen Anne's Lace motifs and then built my chains beginning from the first ch 6 of what would have become the next motif, then ch 6 and sl into the tops of the next 4 loops before ch 6 and turn... the Queen Anne's Lace version has 5 ch 6 loops across whereas the Daisy version has 4.
Row 50: If you begin with the small loop then you get only 3 tassels and 4 loops, which is what I did on this version of the scarf.
Finishing Off
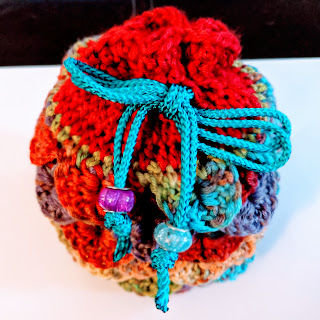
I used knots and big hole (also known as european charm beads) beads with fringe to finish... you can choose to finish your scarf/belt off how you see fit.


the blossoms and bees seem to have sprinkled in just right
I am knotting the tassel as close to the sl stitches as possible and pulling
very tightly, then I use a crochet hook that fits up into the bead
and hooking the bottom of the ch loop and pulling it through.
I slide the bead all the way to the top knot before I knot the bottom
of the loop and put my crochet hook through and tug the knot down towards it.
this leaves me a little loop at the bottom to feed fringe through.

Comments
Post a Comment