granny squared
the totally traditional and still everyday favorite... granny squares are coming back in vogue (I don't recall that they went OUT of fashion, to be honest... and maybe that's just because I LOVE granny squares.)
 many of us learned to crochet by learning these awesomely versatile and fun yarn crafting staples... solid color squares can make 8-Bit blankets and pillows and wall art... mixed colors leave us in fall leaves, gorgeous floral fields and everywhere else in the world on a whim... and when sewn together in other patterns we can have jackets, vests and yes, I have even seen shorts made from granny squares sewn together creatively (no, I have neither gifted nor worn such an item, I am just saying they exist.)


this is a quick lesson in the granny square I learned to make from my mother who learned how to make them from her own mother... who learned to make them from her grandmother.

What You Need:
As many colors of worsted weight yarn as you want to use
5.5mm or I crochet hook
Scissors
Darning or yarn needle
Abbreviations:
ch = chain
sl = slip stitch
dc = double crochet
m/c = magic circle or magic ring (slip knot that enables tightening hole in middle)
cluster = group of stitches crocheted together and counted as one part of a pattern
corner = cluster, ch, cluster pattern

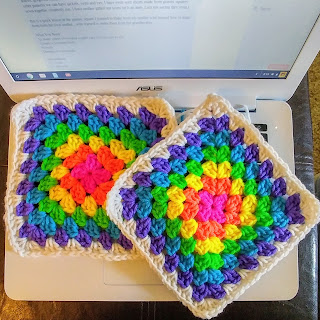
I used Fair Isle Yarn in Liberty weight in colors from the Neon Lights Tin: Atomic Turq, Lemon Pucker, Limerick Pop, Orange You Happy, Pansy and Pink Shock along with Cloud, which is not quite white and so has a very lovely softness to it.
Notes:
-The initial ch 3 of each round counts as your first dc for that cluster.
-Each cluster is made up of 3 dc.
-Each corner is made up of 3 dc, ch 2 and 3 dc all in the same space.
-Work around the spaces between clusters, not in the individual stitches.
-For the first two rounds I will describe stitches happening in each space, after that I will use the terms above. The video follows this same pattern because once you've seen the pattern of growth I believe you'll have it. From there it's just practice.
-Squares after creation... when I say sew in the ends... LOL The more color you use the more sewing you have to do when you're finishing off the square


Granny Squares
Round 1: Begin in a magic circle by chaining 3 and adding 2 dc, ch 1, 3 dc, ch 1, 3 dc, ch 1, 3 dc ch 1 and sl into top of starting ch 3.
You should now have a block with 4 holes and 4 clusters. In Round 2 you are working in the spaces between your clusters.
Round 2: ch 3, 2 dc in first space, 3 dc, ch 2, 3 dc in next space, 3 dc, ch 2, 3 dc in next space, 3 dc ch 2 3 dc in next space, 3 dc, ch 2 and sl to join to top of starting ch 3 of this round.
You should now have a block with 4 definite corners which are each made up of 2 clusters with 2 chains between them.
From here on out you will always do this for your corners... cluster, ch, cluster. You will only ch between clusters on the corners, the rest of your clusters will stand alone.
You are beginning from 1/2 of a corner on each round and finishing it at the end of each round.
Round 3: ch 3, 2 dc in first space, cluster, corner, cluster, corner, cluster, corner, cluster, ch 2 and sl to join to top of starting ch 3 of this round.
Make your squares as big or as small as you like. Make a pile of them. A huge pile of them.
I crochet my squares together by single crocheting the stitches of both squares on that side at the same time... whichever side you crochet them on will show a ridge between the squares, this can make a lovely waffle texture on the front between your mini pieces of art or can be on the back leaving a smooth seam between your squares.


this is a quick lesson in the granny square I learned to make from my mother who learned how to make them from her own mother... who learned to make them from her grandmother.

What You Need:
As many colors of worsted weight yarn as you want to use
5.5mm or I crochet hook
Scissors
Darning or yarn needle
Abbreviations:
ch = chain
sl = slip stitch
dc = double crochet
m/c = magic circle or magic ring (slip knot that enables tightening hole in middle)
cluster = group of stitches crocheted together and counted as one part of a pattern
corner = cluster, ch, cluster pattern
this is a blanket made of squares that aren't striped
This pattern describes the rainbow squares you see here... the wonderful thing about granny squares (as you saw above) is that the sky is the limit for size, color variation and assembly... if you want to make an 8-Bit style blanket you can plot out the size of your squares and how many you need of each color using graph paper... if you want to make a rainbow stash-busting hodge-podge of glorious crazy quilt design then start making and joining your colors as you go and see where it takes you!I used Fair Isle Yarn in Liberty weight in colors from the Neon Lights Tin: Atomic Turq, Lemon Pucker, Limerick Pop, Orange You Happy, Pansy and Pink Shock along with Cloud, which is not quite white and so has a very lovely softness to it.
Notes:
-The initial ch 3 of each round counts as your first dc for that cluster.
-Each cluster is made up of 3 dc.
-Each corner is made up of 3 dc, ch 2 and 3 dc all in the same space.
-Work around the spaces between clusters, not in the individual stitches.
-For the first two rounds I will describe stitches happening in each space, after that I will use the terms above. The video follows this same pattern because once you've seen the pattern of growth I believe you'll have it. From there it's just practice.
-Squares after creation... when I say sew in the ends... LOL The more color you use the more sewing you have to do when you're finishing off the square

front of square

back of square without ends sewn in
-YouTube Video when I can get it loaded. Right now apparently my chromebook wifi connection isn't fast enough.Granny Squares
Round 1: Begin in a magic circle by chaining 3 and adding 2 dc, ch 1, 3 dc, ch 1, 3 dc, ch 1, 3 dc ch 1 and sl into top of starting ch 3.
You should now have a block with 4 holes and 4 clusters. In Round 2 you are working in the spaces between your clusters.
Round 2: ch 3, 2 dc in first space, 3 dc, ch 2, 3 dc in next space, 3 dc, ch 2, 3 dc in next space, 3 dc ch 2 3 dc in next space, 3 dc, ch 2 and sl to join to top of starting ch 3 of this round.
You should now have a block with 4 definite corners which are each made up of 2 clusters with 2 chains between them.
From here on out you will always do this for your corners... cluster, ch, cluster. You will only ch between clusters on the corners, the rest of your clusters will stand alone.
You are beginning from 1/2 of a corner on each round and finishing it at the end of each round.
Round 3: ch 3, 2 dc in first space, cluster, corner, cluster, corner, cluster, corner, cluster, ch 2 and sl to join to top of starting ch 3 of this round.
Make your squares as big or as small as you like. Make a pile of them. A huge pile of them.
I crochet my squares together by single crocheting the stitches of both squares on that side at the same time... whichever side you crochet them on will show a ridge between the squares, this can make a lovely waffle texture on the front between your mini pieces of art or can be on the back leaving a smooth seam between your squares.

Comments
Post a Comment