BOO! 6 Days of Halloween Mini's Just In Time! BATS!!!
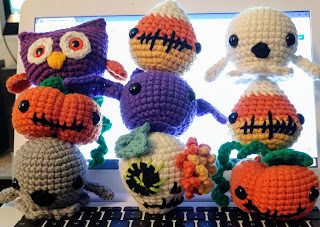
Howdy! TONS of new Halloween themed patterns this week... everyone pictured below and more!
Yes, you read right... that's GHOSTS, BATS, OWLS, SKULLS and FLOWERS, PUMPKINS and LEAVES, CANDY CORN and WITCHES HATS, and as always... free when posted here on the 12SquaredCreations blog.
These dolls and many others are listed for sale in my Etsy shop... or you can use these free patterns to make your own.
I designed these patterns to demonstrate the versatility of a single shape with minor changes or simple decorations... All of these dolls begin with a simple ball shape and come out very differently based on what you do with them. The closest to the original shape are the bat and pumpkin, and the farthest is a tie between the ghost and the skull.
Every day this week I will be posting free patterns, beginning today with this awesome fat little bat!
Supplies
Worsted weight yarns in the colors you need - I used Fair Isle Yarn Liberty Jeepers Creepers Craft Can black and pansy
**Update: This year I used Herrschners Worsted 8 Halloween Shimmer in Purple Potion and Batty
4.5mm crochet hook
darning or yarn needle
scissors
12 mm buttons or safety eyes
stitch marker or contrasting yarn to use as a stitch marker
polyfill or other stuffing. mine is always mixed with the yarn cuttings from previous projects
Abbreviations
MR = Magic Ring
SC = Single Crochet
DC = Double Crochet
TC = Treble or Triple Crochet
SK = Skip a stitch
SL ST = Slip Stitch
CH = Chain
INC = Increase
DEC = Decrease
BLO - Back Loop Only
F/O = Finish Off
Notes
You are working in the round, using a stitch marker will really help.
Back Loop Only or BLO means you are working in the back part of the V formed at the top of each crochet stitch. This forms a flat turn or "sharp corner" in your work. It gives the bat a flat bum to sit on.
These little dolls are addictive, be prepared to go wild with color changes and inspiration... and please, show me what you come up with and tag me at 12SquaredCreations on Instagram so I can see what you made!
Bat
Wings
Ears
I stitched one stitch at either side of the triangle, knotted and buried my ends into the bat’s body. Mine are placed even with the center ring (where we started) and out 2 rows on each side. This coincidentally placed mine 1 row further back than the wings.
I stitched my wings on after I completed the bat body. I counted back 3 stitches from the eyes and up two rows, so into the space between Rounds 8 and 9. How you place your wings can really change your cute fat little bat… try placing them in different ways to see what you think before you sew them in.
I will see you tomorrow with another pattern! It's not just batty around here... :D
Remember to share what you make with me and tag me on Instagram at 12SquaredCreations! I can't wait to see!
Yes, you read right... that's GHOSTS, BATS, OWLS, SKULLS and FLOWERS, PUMPKINS and LEAVES, CANDY CORN and WITCHES HATS, and as always... free when posted here on the 12SquaredCreations blog.
These dolls and many others are listed for sale in my Etsy shop... or you can use these free patterns to make your own.
I designed these patterns to demonstrate the versatility of a single shape with minor changes or simple decorations... All of these dolls begin with a simple ball shape and come out very differently based on what you do with them. The closest to the original shape are the bat and pumpkin, and the farthest is a tie between the ghost and the skull.
Every day this week I will be posting free patterns, beginning today with this awesome fat little bat!
Supplies
Worsted weight yarns in the colors you need - I used Fair Isle Yarn Liberty Jeepers Creepers Craft Can black and pansy
**Update: This year I used Herrschners Worsted 8 Halloween Shimmer in Purple Potion and Batty
4.5mm crochet hook
darning or yarn needle
scissors
12 mm buttons or safety eyes
stitch marker or contrasting yarn to use as a stitch marker
polyfill or other stuffing. mine is always mixed with the yarn cuttings from previous projects
Abbreviations
MR = Magic Ring
SC = Single Crochet
DC = Double Crochet
TC = Treble or Triple Crochet
SK = Skip a stitch
SL ST = Slip Stitch
CH = Chain
INC = Increase
DEC = Decrease
BLO - Back Loop Only
F/O = Finish Off
Notes
You are working in the round, using a stitch marker will really help.
Back Loop Only or BLO means you are working in the back part of the V formed at the top of each crochet stitch. This forms a flat turn or "sharp corner" in your work. It gives the bat a flat bum to sit on.
Bat
I used Fair Isle Liberty in pansy and black
**Update: I used Herrschners Worsted 8 Halloween Shimmer in Batty and Purple Potion
**Update: I used Herrschners Worsted 8 Halloween Shimmer in Batty and Purple Potion
Round 1: 6 SC in MR (6) Tighten and sew in ends after Round 2
Round 2: INC in each around (12)
Round 3: SC then INC and repeat around (18)
Round 4: 2 SC then INC and repeat around (24)
Round 5: 3 SC then INC and repeat around (30)
Round 6: 4 SC then INC and repeat around (36)
Rounds 7-14: SC around (36)
Round 15: 4 SC then DEC and repeat around (30)
Round 16: 3 SC then DEC and repeat around (24)
Round 17: BLO 2 SC then DEC and repeat around (18)
Sew in buttons or add safety eyes. I placed mine in the space between Rounds 10 and 11, with 9 stitches showing between them.
Stuff your bat until he is really round and pretty firm without stretching the stitches so that you can see the filler between them.
Round 18: SC then DEC and repeat around (12)
Round 19: DEC around (6) and F/O by stitching the front loops of the stitches together and pulling tight. Tie off and bury your ends.
Wings
Make 2 in same color as body
Row 1: Leave a long starting tail for attaching to body. CH 12 and work your way back along the CH beginning in 4th CH from hook: SL ST, 3 SC, SK, 4 SC. (8)
Row 2: CH 3 and turn, DC, 2 SC, DC, TC, DC, SC and SL ST
F/O and carefully stitch tail into wing and trim off.
I attached by sewing just the ends of the wing into the bat’s body and then a whip stitch into the other side of the same end of the wing just to give it stability.
Ears
Make 2 in same color as body
Row 1: CH 2, turn and work 2 SC in 2nd stitch from hook
Row 2: CH 1 and turn, work 2 SC in 2nd stitch from hook, CH 1 and F/O
Leave a long string at both ends of this mini triangle - it will help you sort out which side to attach to his little head.
I stitched one stitch at either side of the triangle, knotted and buried my ends into the bat’s body. Mine are placed even with the center ring (where we started) and out 2 rows on each side. This coincidentally placed mine 1 row further back than the wings.
I stitched my wings on after I completed the bat body. I counted back 3 stitches from the eyes and up two rows, so into the space between Rounds 8 and 9. How you place your wings can really change your cute fat little bat… try placing them in different ways to see what you think before you sew them in.
I will see you tomorrow with another pattern! It's not just batty around here... :D
Remember to share what you make with me and tag me on Instagram at 12SquaredCreations! I can't wait to see!


Comments
Post a Comment