monster phone pouches
who doesn't love muppets? these ridiculous little phone pouches emulate the bright colors and fun of the muppet faces that we all know and grew up with... and leave you the freedom to design your own monsters and make them totally your own.


what you'll need
 worsted weight yarn in the colors that you want - I used Fair Isle Yarn Liberty
5.5mm crochet hook
scissors
yarn or darning needle
decorative beads or dangle charms as desired
abbreviations
blo = back loop only
ch = chain
dc = double crochet
f/o = finish off, I do this by slip stitching and cutting a long tail and pulling it through the stitch
hdc = half double crochet
inc = increase - work 2 stitches in the space of one
flo = front loop only
m/c = magic circle, a slip knot crocheted in to so that it can be tightened
sc = single crochet
sl = slip stitch
terms
in the round - worked in a continuous spiral instead of ending each row
in the back hump - a crocheted chain has a v on the top and a hump on the back, basically crochet on the back of the chain. this is used to create a smooth foundation edge that looks more like the finished edge on your crocheted edge (see photos below)


 notes
notes
-back loop only is used in this pattern to make the bottom of your pouch clearly defined
-front loop only is used in this pattern to leave a loop on the inside of the pouch to attach an inside pocket to
- by skipping a stitch and slip stitching into the next one on the round parts you are making the edge more evenly round. I don't bother with the pupils because they are so small that you can stitch them more round when sewing them down
-I stitch into the faces of the crochet instead of all the way through to the backs of stitches when I'm applying applique eyes and tongue and stitching down the pocket because I don't want the stitches to show on the other side of the pouch
-the neck strap is shorter than a shoulder strap because it's made to be worn around the neck... if you want to make your pouches cross body I recommend that they be 2 double crochets wide, not just one, and will tell you that the standard drop on a shoulder bag is 22-25", so the strap needs to be 44-50" long or more... measure your chain and work from there as you desire
-all decorations are just suggestions... I have other bags that are zombies, or monsters with one eye or that have arms... the sky is the limit here... be creative and make what you want, not just what you see.

 Monster Phone Pouch
I work the fiddly bits first and then make the pouch so that it can all be assembled at once
eyes
these are made in 2 parts, make 2 of each and then assemble
I used Fair Isle Liberty in Cloud and Black
whites:
Round 1: 8 hdc in a m/c - pull tight and sew in after round 2
Round 2: inc in each around - after last stitch, skip one stich and sl into the next to f/o
leave a long tail for attaching to the pouch
pull tight and sew in your middle end
iris/black part:
Round 1: 8 sc in a m/c - sl into top of first stitch and leave a long tail for attaching to the whites
pull tight and sew in your middle end
assembly:
center the iris over the white and use the black yarn from the iris to stitch down onto the white by going through both parts all the way to front and back
tie off your end on the back of the white
you will use the tail on the white to attach to the pouch later
tongue
I used red yarn - Fair Isle Liberty in Lipstick
Row 1: ch 10, dc in 3rd ch from hook and dc back along the chain (10) ch 1 and f/o with long tail for attaching to pouch
strap
I used the same color as the body of the pouch
ch 103, dc in 4th stitch from hook in the back hump of the stitch and dc all the way back still using the back hump of the chain stitches (100) ch 1 and f/o leaving a long tail to attach to pouch
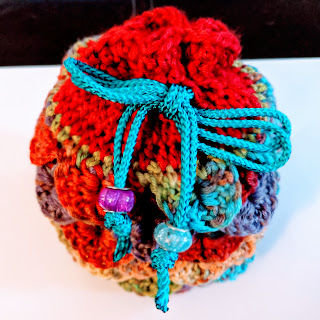
phone pouch
pictured here are Fair Isle Liberty Craft in Pink Shock, Pool and Orange You Happy (green is using up neon green by red heart super saver)
you are working in the round, use a stitch marker or a contrasting piece of yarn to keep your place
Round 1: ch 13, work hdc in 2nd ch from hook in the back hump of the stitches and in next 11 still in the back humps of the stitches, then work 3 hdc in 12th ch and work back along the ch on the other side going through both of the loops left over on each stitch, 11 hdc and 2 hdc in last stitch (26)
Round 2: blo hdc around (26)
Rounds 3-9: hdc around (26)
Round 10: 14 hdc then flo work 11 hdc, then last hdc in full stitch (26)
Rounds 11-13: hdc around (26)
Round 14: 1 hdc then ch 13, skip 13 and hdc the rest of the way around (26)
Round 15: you will be working in the back hump of the chain section - 1 hdc then working in back hump of chain 13 hdc then top of stitches hdc around (26)
Rounds 16-19: hdc around (26)
Round 20: you are closing the top of the pouch and making ears here, squish the top flat and work through front and back of pouch, all 4 loops of the stitches - hdc in 1st stitch and then ch, going through the same stitch and the top of the last stitch from Round 19 work 2 dc, next stitch through front and back of pouch work a dc, next stitch work a dc, next stitch hdc, 5 sc, hdc, dc, dc, 2 dc in last stitch and sl to f/o and sew in end
inside pouch
I used the same color as the body of the pouch
this is worked in the leftover back loops from Round 10 of the pouch body
turn the pouch wrong side out and find the back loops left on Round 10, start working in the last back loop in the row by tying your yarn into it and pulling up a loop on your crochet hook - leave a long tail for sewing this side of the pocket to the pouch
you are working in straight rows, and turning your work as you go - the ch 2 counts as your first dc
Row 1: ch 2 in first loop where you tied off your yarn, dc across (11) ch 2 and turn
Row 2: work 10 dc (11) ch 2 and turn
Row 3: work 10 dc (11) ch 2 and turn
Row 4: work 10 dc (11) c 1 and turn
Row 5: sc between each dc, sl and f/o in last stitch leaving long tail to close pocket to pouch
using the long tail from tying your yarn in to begin the pocket stitch the edge of the pocket to the pouch and then tie off and bury your end in the back of the stitches
using the long tail from the end of your pocket sew down this side of the pocket in the backs of the stitches and then tie off and bury your end in the back of the stitches
turn the bag back right side out - the pocket reaches almost to the top of the pouch, this is ok... you will see in the photos above that it makes it more secure for your money and credit cards because you have to choose to fold down the top of your monster's head to access the pocket
assembly


-To sew in the tongue stitch through the edge of the top dc and the tops of the stitches on the row of half double crochet at the bottom of the mouth opening (Round 13) and bury your ends into your row
of sewing or the backs of stitches inside the pouch because the red will stand out on the other colors
-sew the strap through the whole body of the pouch at the sides of the mouth opening on both sides and bury your ends into the inside of the pouch... remember, go through the whole stitch and not just loops on both the bag and the strap so that everything is secure.
-add your extra decorations and you have a cool new bag!


what you'll need

5.5mm crochet hook
scissors
yarn or darning needle
decorative beads or dangle charms as desired
abbreviations
blo = back loop only
ch = chain
dc = double crochet
f/o = finish off, I do this by slip stitching and cutting a long tail and pulling it through the stitch
hdc = half double crochet
inc = increase - work 2 stitches in the space of one
flo = front loop only
m/c = magic circle, a slip knot crocheted in to so that it can be tightened
sc = single crochet
sl = slip stitch
terms
in the round - worked in a continuous spiral instead of ending each row
in the back hump - a crocheted chain has a v on the top and a hump on the back, basically crochet on the back of the chain. this is used to create a smooth foundation edge that looks more like the finished edge on your crocheted edge (see photos below)


-back loop only is used in this pattern to make the bottom of your pouch clearly defined
-front loop only is used in this pattern to leave a loop on the inside of the pouch to attach an inside pocket to
- by skipping a stitch and slip stitching into the next one on the round parts you are making the edge more evenly round. I don't bother with the pupils because they are so small that you can stitch them more round when sewing them down
-I stitch into the faces of the crochet instead of all the way through to the backs of stitches when I'm applying applique eyes and tongue and stitching down the pocket because I don't want the stitches to show on the other side of the pouch
-the neck strap is shorter than a shoulder strap because it's made to be worn around the neck... if you want to make your pouches cross body I recommend that they be 2 double crochets wide, not just one, and will tell you that the standard drop on a shoulder bag is 22-25", so the strap needs to be 44-50" long or more... measure your chain and work from there as you desire
-all decorations are just suggestions... I have other bags that are zombies, or monsters with one eye or that have arms... the sky is the limit here... be creative and make what you want, not just what you see.


I work the fiddly bits first and then make the pouch so that it can all be assembled at once
eyes
these are made in 2 parts, make 2 of each and then assemble
I used Fair Isle Liberty in Cloud and Black
whites:
Round 1: 8 hdc in a m/c - pull tight and sew in after round 2
Round 2: inc in each around - after last stitch, skip one stich and sl into the next to f/o
leave a long tail for attaching to the pouch
pull tight and sew in your middle end
iris/black part:
Round 1: 8 sc in a m/c - sl into top of first stitch and leave a long tail for attaching to the whites
pull tight and sew in your middle end
assembly:
center the iris over the white and use the black yarn from the iris to stitch down onto the white by going through both parts all the way to front and back
tie off your end on the back of the white
you will use the tail on the white to attach to the pouch later
tongue
I used red yarn - Fair Isle Liberty in Lipstick
Row 1: ch 10, dc in 3rd ch from hook and dc back along the chain (10) ch 1 and f/o with long tail for attaching to pouch
strap
I used the same color as the body of the pouch
ch 103, dc in 4th stitch from hook in the back hump of the stitch and dc all the way back still using the back hump of the chain stitches (100) ch 1 and f/o leaving a long tail to attach to pouch
phone pouch
pictured here are Fair Isle Liberty Craft in Pink Shock, Pool and Orange You Happy (green is using up neon green by red heart super saver)
you are working in the round, use a stitch marker or a contrasting piece of yarn to keep your place
Round 1: ch 13, work hdc in 2nd ch from hook in the back hump of the stitches and in next 11 still in the back humps of the stitches, then work 3 hdc in 12th ch and work back along the ch on the other side going through both of the loops left over on each stitch, 11 hdc and 2 hdc in last stitch (26)
Round 2: blo hdc around (26)
Rounds 3-9: hdc around (26)
Round 10: 14 hdc then flo work 11 hdc, then last hdc in full stitch (26)
Rounds 11-13: hdc around (26)
Round 14: 1 hdc then ch 13, skip 13 and hdc the rest of the way around (26)
Round 15: you will be working in the back hump of the chain section - 1 hdc then working in back hump of chain 13 hdc then top of stitches hdc around (26)
Rounds 16-19: hdc around (26)
Round 20: you are closing the top of the pouch and making ears here, squish the top flat and work through front and back of pouch, all 4 loops of the stitches - hdc in 1st stitch and then ch, going through the same stitch and the top of the last stitch from Round 19 work 2 dc, next stitch through front and back of pouch work a dc, next stitch work a dc, next stitch hdc, 5 sc, hdc, dc, dc, 2 dc in last stitch and sl to f/o and sew in end
inside pouch
I used the same color as the body of the pouch
this is worked in the leftover back loops from Round 10 of the pouch body
turn the pouch wrong side out and find the back loops left on Round 10, start working in the last back loop in the row by tying your yarn into it and pulling up a loop on your crochet hook - leave a long tail for sewing this side of the pocket to the pouch
you are working in straight rows, and turning your work as you go - the ch 2 counts as your first dc
Row 1: ch 2 in first loop where you tied off your yarn, dc across (11) ch 2 and turn
Row 2: work 10 dc (11) ch 2 and turn
Row 3: work 10 dc (11) ch 2 and turn
Row 4: work 10 dc (11) c 1 and turn
Row 5: sc between each dc, sl and f/o in last stitch leaving long tail to close pocket to pouch
using the long tail from tying your yarn in to begin the pocket stitch the edge of the pocket to the pouch and then tie off and bury your end in the back of the stitches
using the long tail from the end of your pocket sew down this side of the pocket in the backs of the stitches and then tie off and bury your end in the back of the stitches
turn the bag back right side out - the pocket reaches almost to the top of the pouch, this is ok... you will see in the photos above that it makes it more secure for your money and credit cards because you have to choose to fold down the top of your monster's head to access the pocket
assembly

you work your way across the pocket, ch 2 and turn

and then you have a flap on the inside of the bag to stitch down

by stitching through the tops of the stitches on the pouch you avoid
having the stitches show on the outside of the bag
-I attach the eyes first... you can hang them down a little over the mouth opening or up a bit, I chose up a bit so that they are level with the mouth opening and in just a little bit from the sides so that they touch in the middle. Sew clear through the white of the eye and through the tops of the stitches on the pouch, it's ok if your stitches show on the inside of the pouch so you can sew clear through if you want to, just make sure your stitches go through the main part of a stitch and not just a loop.-To sew in the tongue stitch through the edge of the top dc and the tops of the stitches on the row of half double crochet at the bottom of the mouth opening (Round 13) and bury your ends into your row
of sewing or the backs of stitches inside the pouch because the red will stand out on the other colors
-sew the strap through the whole body of the pouch at the sides of the mouth opening on both sides and bury your ends into the inside of the pouch... remember, go through the whole stitch and not just loops on both the bag and the strap so that everything is secure.
-add your extra decorations and you have a cool new bag!

Comments
Post a Comment