crochet doughnut coaster free pattern
I know... everyone has done this... and not quite this way. So I'm jumping in on the doughnut train and giving you this fantastic pattern so you can jump on in with us, because it's awesome! And fun!
 See, I saw a thing at polkadotsandladybugs16 on Instagram and knew I had to make some as a gift for my sister. If you don't want to bother making these for yourself, this lovely lady has some already made in her Etsy shop at great prices and I'm sure she'd even send them to the recipient for you, if you asked nicely.
 I frogged* my experimental doughnuts half a dozen times trying to get the weight and the lay correct... I've made SO many 3D doughnuts you'd think I could make one lie down, right? LOL
The lovely April at Polkadotsandladybugs pointed me to the pattern she used on Pinterest here. It's awesome. And too big for what I want to do with mine. And I learned a thing! THE thing, in fact... And so I'm making mine... and giving you the pattern. With the thing I learned!
 Supplies
Worsted Weight Yarn in 2 colors... your cake color and your frosting color (great for yarn ends!)
6mm crochet hook
Darning or Yarn needle
Scissors
Stitch Marker
Notes
CH = Chain
BLO = Back Loop Only, worked in the back of the top of the stitch from the round before
FLO = Front Loop Only, worked in the front of the top of the stitch from the round before
F/O = Finish Off
SC = Single Crochet
HDC = Half Double Crochet
DC = Double Crochet
INC = Increase, work 2 stitches in the same space
SL ST = Slip Stitch
 THE DOUGHNUT
frosting flowers... :D
Round 1: CH 9 and SL ST to join into a ring. 12 SC around the CH ring you have formed. Do not join, you are working in rounds. (12)

 Round 2: FLO for the whole Round. SC in 1st and INC in 2nd. Repeat around. (18)
Round 3: Return to traditional crochet, through both parts of the top of the stitch from the previous Round. 2 SC then INC and repeat around. (24)
 Round 4: SC in 1st stitch, HDC and DC in next, DC and HDC in next, SL ST in the next. Repeat the pattern around making 6 petals. F/O after your final SL ST.
Snip your ends and actually F/O this piece on the "wrong" side as it will lay flat on the cake and wont be seen.

the cake
Fold the center of the doughnut so that you can work with the "right side" facing up (see photo below) and SL ST to join your cake color through one of the BLO left from Round 2 of the frosting flower (see photo below)

 TIPS:
TIPS:
 Round 2: 2 SC then INC and repeat around (24)
Round 3: 3 SC then INC and repeat around (30)
Round 4: 4 SC then INC and repeat around (36)
Round 5: 3 SC then INC then 2 SC and repeat around (42) this moves the INC so that the shape is more round. F/O and leave a long tail for stitching the frosting flower edges down to the doughnut. (see photos below)


SO super fast and easy... and you can be SO creative! You can use any worsted weight yarn... or any weight of yarn... the real trick is in the FLO/BLO join of the two types of yarn so that your coaster is double weight where it matters and the center sinks in a bit.
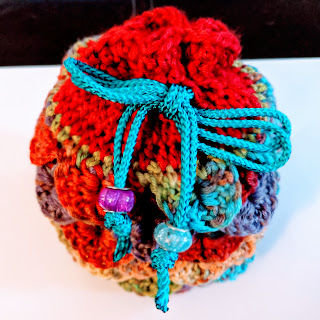
NOTE: I would recommend against adding ACTUAL bling to your doughnut coasters the way that I do with my 3D doughnuts... perhaps stitching on some sprinkles in a contrasting yarn so that the surface stays flat and level would be preferred so no drinks are toppled accidentally.
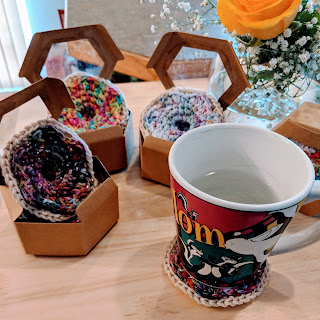
 Super simple gifts for a housewarming, birthday or wedding party... and any other event you think warrants something sweet and handmade from you to the recipient. I happened to have these boxes that were gotten as gift wrap for my sister's wedding, and happened to come with doughnut stickers. LOL I got them on Amazon here. WARNING: you have to buy them in 50's.

 My sets each took me about an hour to complete, and I did them in 4's that matched. I used beige and hand-dyed Premier Home Cotton and Home Cotton Glitz and Bernat Handicrafter cottons that were dyed up from white using cold water tie dye kits by Tulip.
*frogged = pulled out and restarted the pattern again... there's a joke that goes, "Know why it's called frogging? Because you RIP IT RIP IT RIP IT." :D LOL


The lovely April at Polkadotsandladybugs pointed me to the pattern she used on Pinterest here. It's awesome. And too big for what I want to do with mine. And I learned a thing! THE thing, in fact... And so I'm making mine... and giving you the pattern. With the thing I learned!

Worsted Weight Yarn in 2 colors... your cake color and your frosting color (great for yarn ends!)
6mm crochet hook
Darning or Yarn needle
Scissors
Stitch Marker
Notes
- This pattern is made in 2 parts... I make the frosting layers THEN I go back and make the cake layers and stitch them together. I find it works out faster this way. I am gifting mine in sets of 4, you can make as many or as few of any type of doughnut as you like.
- This pattern is worked in the round... a stitch marker can be your friend if you're just starting out or are distracted 1,000 times in an hour like I am.
- This pattern can be made with ANY worsted weight yarn. I'm sort of a purist and like my coasters to be made from cotton because it actually absorbs water. Wool will, too... as will many blended fibers.
- Working AROUND the chain means just that... see photo below. You're going around the chain, not through the stitches.
- These coasters should measure between 3-4" in diameter depending on your tension... mine are coming out exactly 3.5" which is what I was hoping for. :D
CH = Chain
BLO = Back Loop Only, worked in the back of the top of the stitch from the round before
FLO = Front Loop Only, worked in the front of the top of the stitch from the round before
F/O = Finish Off
SC = Single Crochet
HDC = Half Double Crochet
DC = Double Crochet
INC = Increase, work 2 stitches in the same space
SL ST = Slip Stitch

frosting flowers... :D
Round 1: CH 9 and SL ST to join into a ring. 12 SC around the CH ring you have formed. Do not join, you are working in rounds. (12)


Round 3: Return to traditional crochet, through both parts of the top of the stitch from the previous Round. 2 SC then INC and repeat around. (24)

Snip your ends and actually F/O this piece on the "wrong" side as it will lay flat on the cake and wont be seen.

the cake
Fold the center of the doughnut so that you can work with the "right side" facing up (see photo below) and SL ST to join your cake color through one of the BLO left from Round 2 of the frosting flower (see photo below)


- you can leave your "ends" from tying on the cake color between the frosting and the cake, they wont be seen. I crochet around them for a few stitches and then leave them where they are.
- when beginning to build the cake I jog part way around the center from where I started because the round is "wonky" and not straight around because we're working in a continuing spiral.
- when stitching the two pieces together try to be very careful to go through only the bottom or "wrong side" of the frosting flower stitches so that they don't show on the top. (see photo below after Round 5)

Round 3: 3 SC then INC and repeat around (30)
Round 4: 4 SC then INC and repeat around (36)
Round 5: 3 SC then INC then 2 SC and repeat around (42) this moves the INC so that the shape is more round. F/O and leave a long tail for stitching the frosting flower edges down to the doughnut. (see photos below)


SO super fast and easy... and you can be SO creative! You can use any worsted weight yarn... or any weight of yarn... the real trick is in the FLO/BLO join of the two types of yarn so that your coaster is double weight where it matters and the center sinks in a bit.
NOTE: I would recommend against adding ACTUAL bling to your doughnut coasters the way that I do with my 3D doughnuts... perhaps stitching on some sprinkles in a contrasting yarn so that the surface stays flat and level would be preferred so no drinks are toppled accidentally.


Please remember to tag me on Instagram
@ and #12SquaredCreations because I love to see
what you do with my patterns and how you dress them up
and make them your own!
*frogged = pulled out and restarted the pattern again... there's a joke that goes, "Know why it's called frogging? Because you RIP IT RIP IT RIP IT." :D LOL

Comments
Post a Comment